# 开发 \| 手把手,教你在小程序里做一个圆形进度条
- 作者:刘凌歌
- 发布时间:2018-03-01 19:00
- 原文:https://www.ifanr.com/minapp/987731
今天想把之前在微信小程序开发过程中,制作的一个圆形进度条做成一个组件,方便以后直接拿来用。
### 创建自定义组件
**一、创建项目结构**
打开微信开发者工具创建一个项目, 新建 与 `pages` 同级目录 `components`,在 `components` 中新建一个目录 `circle` ,`circle` 中新建 `Component` 命名为 circle,此时将自动生成 `json`、`wxml、` `wxss`、`js` 4 个文件。结构如下:

**二、编写组件**
**首先需要在 `json` 文件中进行自定义组件声明**(将 `component` 字段设为 `true`,可将这一组文件设为自定义组件)。
```
{
"component": true
}
```
同时,**还要在 `wxml` 文件中编写组件模版,在 `wxss` 文件中加入组件样式**,这里编写圆环进度条的模板和样式,参见微信小程序之圆形进度条。
要注意 `canvas` 绘制的是 px 为单位的,所以这里统一用 px 单位;其中 `size` 是根据 `canvas` 绘制的圆环的直径,后面在 `js` 中会提到。
在组件的 `wxml` 中可以包含 `slot` 节点,用于承载组件使用者提供的 `wxml` 结构。
```
```
注意:在组件 `wxss` 中不应使用 ID 选择器、属性选择器和标签名选择器。
```
/* components/circle/circle.wxss */
.circle_box,.circle_draw{ position: relative; }
.circle_bg{position: absolute;}
```
### 编写 js
在自定义组件的 `js` 文件中,需要使用 `Component()` 来注册组件,并提供组件的属性定义、内部数据和自定义方法。
组件的属性值和内部数据将被用于组件 `wxml` 的渲染,其中,属性值是可由组件外部传入的。更多细节参考 [Component 构造器](https://mp.weixin.qq.com/debug/wxadoc/dev/framework/custom-component/component.html)。
```
/* components/circle/circle.js */
Component({
……
methods: {
/* id : canvas 组件的唯一标识符 canvas-id ,x : canvas 绘制圆形的半径, w : canvas 绘制圆环的宽度 */
drawCircleBg: function (id, x, w) {
// 设置圆环外面盒子大小 宽高都等于圆环直径
this.setData({
size: 2 * x
});
// 使用 wx.createContext 获取绘图上下文 ctx 绘制背景圆环
var ctx = wx.createCanvasContext(id)
ctx.setLineWidth(w / 2); ctx.setStrokeStyle('#20183b'); ctx.setLineCap('round')
ctx.beginPath();//开始一个新的路径
//设置一个原点(x,y),半径为r的圆的路径到当前路径 此处x=y=r
ctx.arc(x, x, x - w, 0, 2 * Math.PI, false);
ctx.stroke();//对当前路径进行描边
ctx.draw();
},
drawCircle: function (id, x, w, step) {
// 使用 wx.createContext 获取绘图上下文 context 绘制彩色进度条圆环
var context = wx.createCanvasContext(id);
// 设置渐变
var gradient = context.createLinearGradient(2 * x, x, 0);
gradient.addColorStop("0", "#2661DD"); gradient.addColorStop("0.5", "#40ED94"); gradient.addColorStop("1.0", "#5956CC");
context.setLineWidth(w); context.setStrokeStyle(gradient); context.setLineCap('round')
context.beginPath();//开始一个新的路径
// step 从0到2为一周
context.arc(x, x, x - w, -Math.PI / 2, step * Math.PI - Math.PI / 2, false);
context.stroke();//对当前路径进行描边
context.draw()
},
_runEvent() {
//触发自定义组件事件
this.triggerEvent("runEvent")
}
},
……
})
```
自定义组件圆形进度条到此已经完成。
### 使用自定义组件
下面我们在 index 中使用自定义组件圆形进度条。
**一、`json` 文件中进行引用声明**
使用已注册的自定义组件前,**首先要在页面的 json 文件中进行引用声明。**此时需要提供每个自定义组件的标签名和对应的自定义组件文件路径:
```
{
"usingComponents": {
"circle": "/components/circle/circle"
}
}
```
**二、`wxml` 文件中使用自定义组件**
这样,在页面的 wxml 中就可以像使用基础组件一样使用自定义组件。节点名即自定义组件的标签名,节点属性即传递给组件的属性值。
- 节点名即自定义组件的标签名:circle;
- 节点属性即传递给组件的属性值:bg,draw;
- 当自定义组件触发 runEvent 事件时,调用\_runEvent 方法。
```
{{txt}}
```
自定义组件的 `wxml` 节点结构在与数据结合之后,将被插入到引用位置内。在 `wxss` 给 `slot` 位置上的内容添加一些样式。
```
/**index.wxss**/
/*圆环进度条文字*/
.circle_info{
position: absolute;
width: 100%;
left: 50%;
top: 50%;
transform: translate(-50%,-50%);
display: flex;
align-items: center;
justify-content: center
}
.circle_dot{
width:16rpx;
height: 16rpx;
border-radius: 50%;
background-color: #fb9126;
}
.circle_txt{
padding-left: 10rpx;
color: #fff;
font-size: 36rpx;
letter-spacing: 2rpx;
}
```
**三、`js` 文件中调用自定义组件中的方法**
在 `wxml` 中我们用到一个数据 `{{txt}}`,我们需要在 `js` 中设置一下 `data`,然后在 `onReady` 中使用 `selectComponent` 选择组件实例节点。
```
//index.js
data: {
txt: "正在匹配中..."
},
onReady: function () {
// 获得circle组件
this.circle = this.selectComponent("#circle1");
// 绘制背景圆环
this.circle.drawCircleBg('circle_bg1', 100, 8)
// 绘制彩色圆环
this.circle.drawCircle('circle_draw1', 100, 8, 2);
},
```
效果如下:
`this.circle.drawCircle('circle_draw1', 100, 8, 0.5);`

`this.circle.drawCircle('circle_draw1', 100, 8, 1);`

`this.circle.drawCircle('circle_draw1', 100, 8, 2);`

接下来要写定时器方法了,在定时器中每隔一段时间调用一次 `this.circle.drawCircle(id, x, w, step)`,通过改变 `step` 的值来动态绘制圆环。
1. 在 `data` 中设置几个初始值
2. 定义一个定时器方法 `countInterval`,假设每隔 100 毫秒 `count` 递增
+1,当 `count` 递增到 100 的时候刚好是一个圆环,然后改变 `txt` 值并且清除定时器
3. 在 `onReady` 中调用这个定时器方法
```
data: {
txt: "正在匹配中...",
count: 0,//计数器,初始值为0
maxCount: 100, // 绘制一个圆环所需的步骤
countTimer: null,//定时器,初始值为null
},
countInterval: function () {
// 设置倒计时 定时器 假设每隔100毫秒 count递增+1,当 count递增到两倍maxCount的时候刚好是一个圆环( step 从0到2为一周),然后改变txt值并且清除定时器
this.countTimer = setInterval(() => {
if (this.data.count <= 2 * this.data.maxCount) {
// 绘制彩色圆环进度条
this.circle.drawCircle('circle_draw1', 100, 8, this.data.count / this.data.maxCount)
this.data.count++;
} else {
this.setData({
txt: "匹配成功"
});
clearInterval(this.countTimer);
}
}, 100)
},
onReady: function () {
// 获得circle组件
this.circle = this.selectComponent("#circle1");
// 绘制背景圆环
this.circle.drawCircleBg('circle_bg1', 100, 8)
// 绘制彩色圆环
// this.circle.drawCircle('circle_draw1', 100, 8, 2);
this.countInterval()
},
```
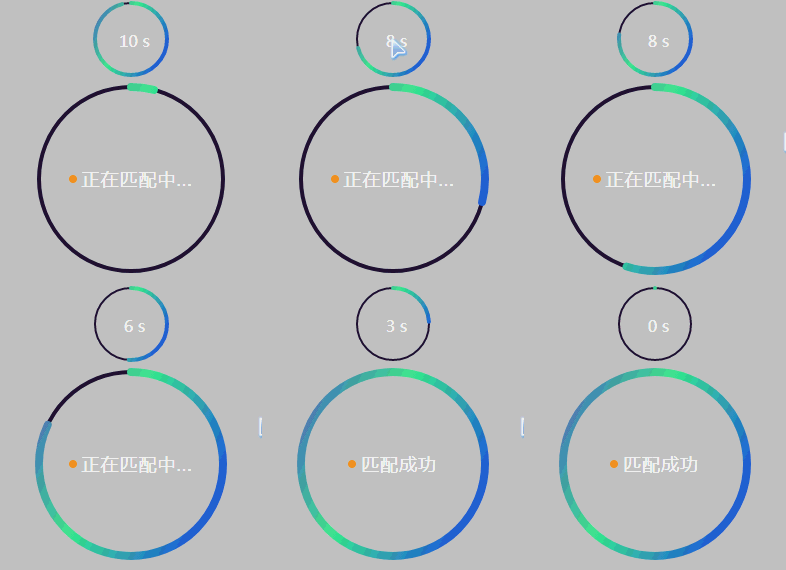
### 最终效果

---
### 再次使用自定义组件做倒计时
`count` 可以递增,当然可以递减。这里就不在赘述,直接上代码:
`wxml`
```
{{time}} s
```
`wxss`
```
/*圆环倒计时*/
.circle_text{
position: absolute;
left: 50%;
top: 50%;
transform: translate(-50%,-50%);
}
.circle_time{
color: #fff;
font-size: 32rpx;
padding-left: 16rpx;
}
```
`js`
```
const app = getApp()
Page({
……
stepInterval: function () {
var n = this.data.num / 2 // 设置倒计时 定时器
this.stepTimer = setInterval(() => {
if (this.data.num >= 0) {
this.data.step = this.data.num / n;
this.circle.drawCircle('circle_draw', 40, 4, this.data.step)// 绘制彩色圆环进度条
if ((/(^[1-9]\d*$)/.test(this.data.num / 10))) {
this.setData({ // 当时间为整数秒的时候 改变时间
time: this.data.num / 10
});
}
this.data.num--;
} else {
this.setData({
time: 0
});
}
}, 100)
},
changeTime: function () {
clearInterval(this.stepTimer);
this.setData({
num: 100
});
this.stepInterval() // 重新开启倒计时
this._runEvent() // 触发自定义组件事件
},
……
})
```
### 最终效果
**关注「知晓程序」微信公众号,回复「开发」,让你的小程序性能再上一层楼。**
****